![Untitled design (3)-1.png]](https://support.toughcommerce.com/hs-fs/hubfs/Untitled%20design%20(3)-1.png?width=40&height=40&name=Untitled%20design%20(3)-1.png)
Send a single, consolidated summary of multiple invoices to a customer, making it faster to follow up and easier for them to understand their total balance in one view.
Statements are sent from the Aging page in the Dashboard. To get there, go to Finance > Aging. Every statement email includes a button that takes your customer to the Payment Portal, where they can pay their outstanding balance.
Please note: Statements has moved from the Portal into the Dashboard. You no longer need to switch to the Portal to send statements.
Why Use Statements?
- One email instead of many – Follow up on every outstanding invoice for a customer in a single send
- A clear total – Customers see each invoice, how overdue it is, and their total balance in one view
- Pay in one click – The Payment Portal button lets customers pay their balance straight from the email
- Faster approval – A complete picture makes it easier for a customer's accounts payable team to approve and pay everything at once
- Less manual chasing – Auto-send statements follow up on overdue invoices for you until the balance is cleared
Sending a Statement
A statement combines a customer's selected invoices into one email, with a summary of each invoice and the total amount owed.
Tip: Not sure who to follow up with first? Check the 61–90 Days and 90+ Days columns on the Aging page to see which customers owe the oldest balances.
Send a Statement
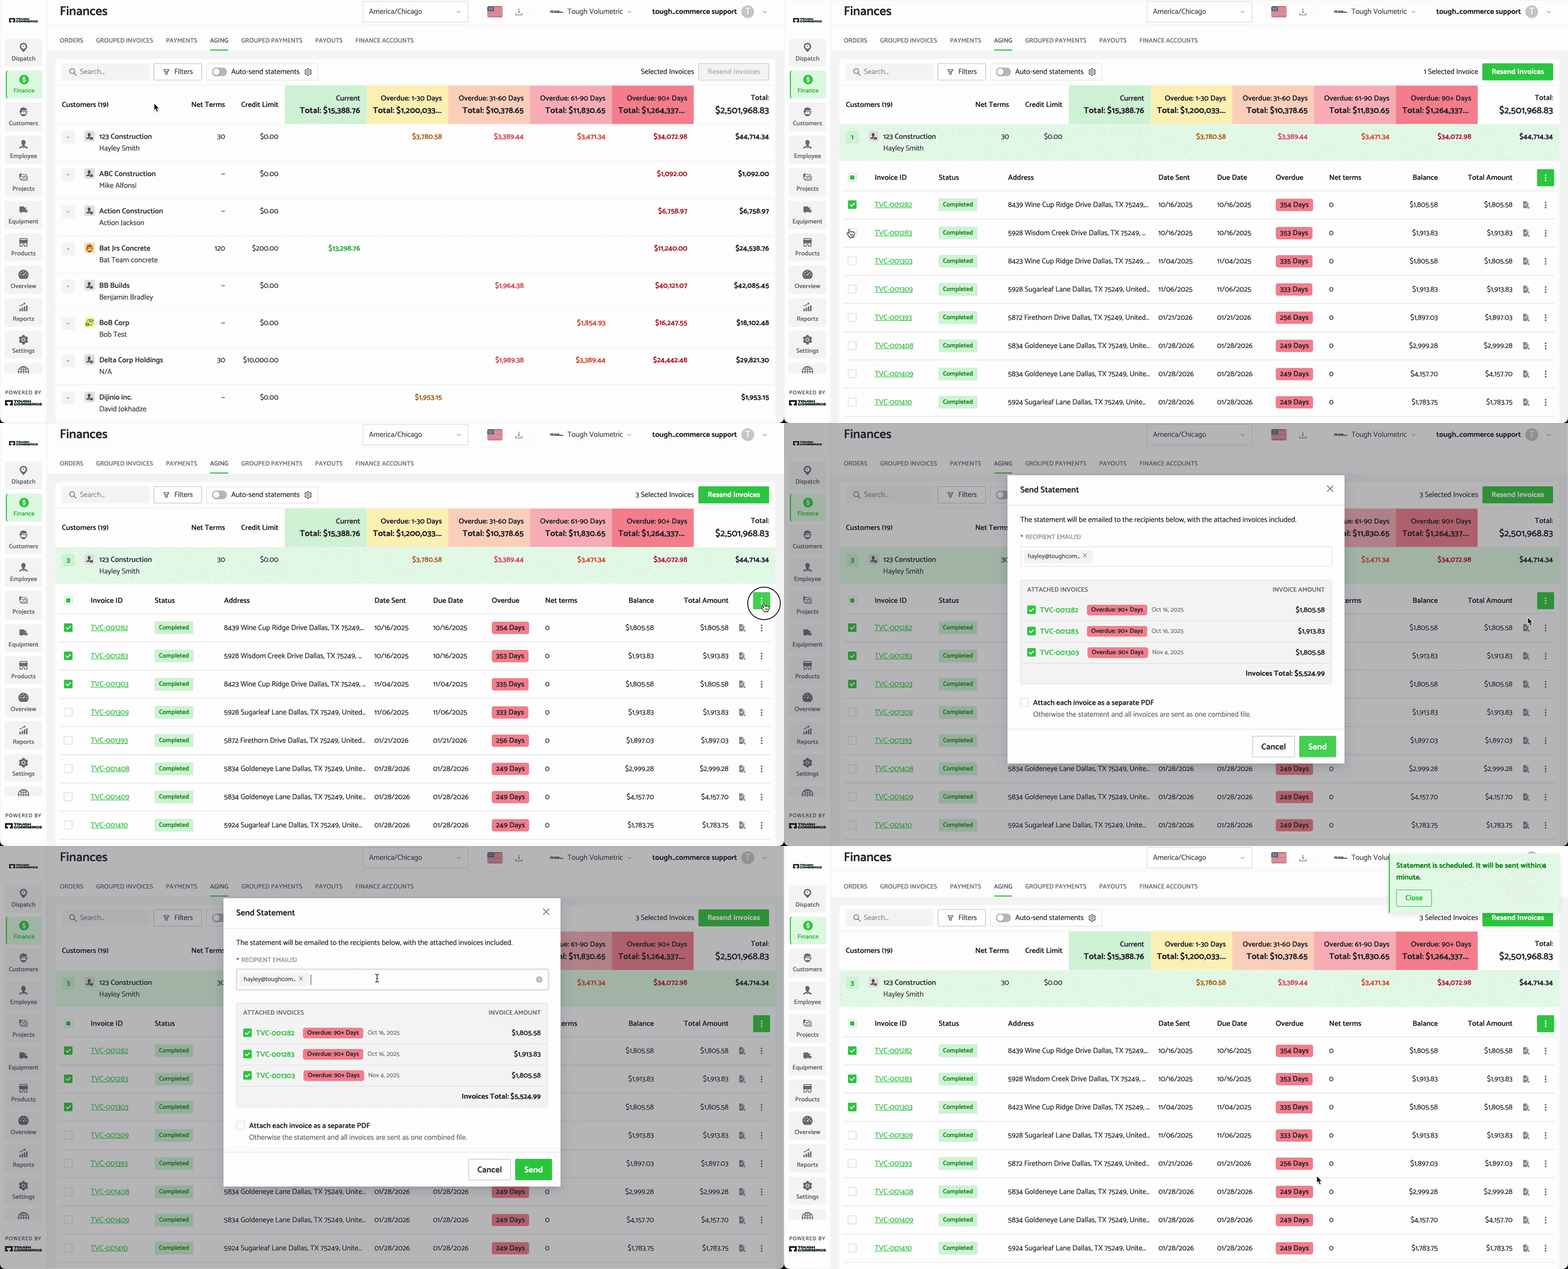
- Go to Finance > Aging and click the customer to expand their invoices
- Select the invoices you want to include using the checkbox on the left-hand side
- Tip: Tick the checkbox in the header row to select every outstanding invoice for that customer
- Click the green 3-dot menu in the top right corner of the customer's invoice list and select Send Statement
- The Send Statement modal will appear
- Review the Recipient Email(s):
- The customer's accounting email address(es) are added automatically
- Type an email address and click Enter to add an additional recipient
- Click the x beside an email address to remove it
- Review the Attached Invoices, which show:
- Invoice ID
- Aging bucket (for example, Overdue: 90+ Days)
- Due Date
- Invoice amount
- Invoices Total for all selected invoices
- Untick any invoice you don't want to include
- Choose whether to tick Attach each invoice as a separate PDF (see below)
- Click Send
To send a statement for a single invoice, click the invoice's 3-dot menu > Send Statement. To send statements to all of your customers at once, use Auto-send Statements (see below).
Statement Attachments
By default, the statement and all included invoices are sent as one combined PDF.
Tick Attach each invoice as a separate PDF to send each invoice as its own file as well. This option is unticked by default.
Tip: Some accounts payable teams need one invoice per file to enter them into their system. For those customers, tick this option to save them a step.
Auto-send Statements
Auto-send statements emails a statement to every customer with outstanding invoices on a schedule you choose, until their balance is cleared. This saves you from chasing overdue invoices by hand each month.
Set Up Automatic Statement Reminders
- Go to Finance > Aging
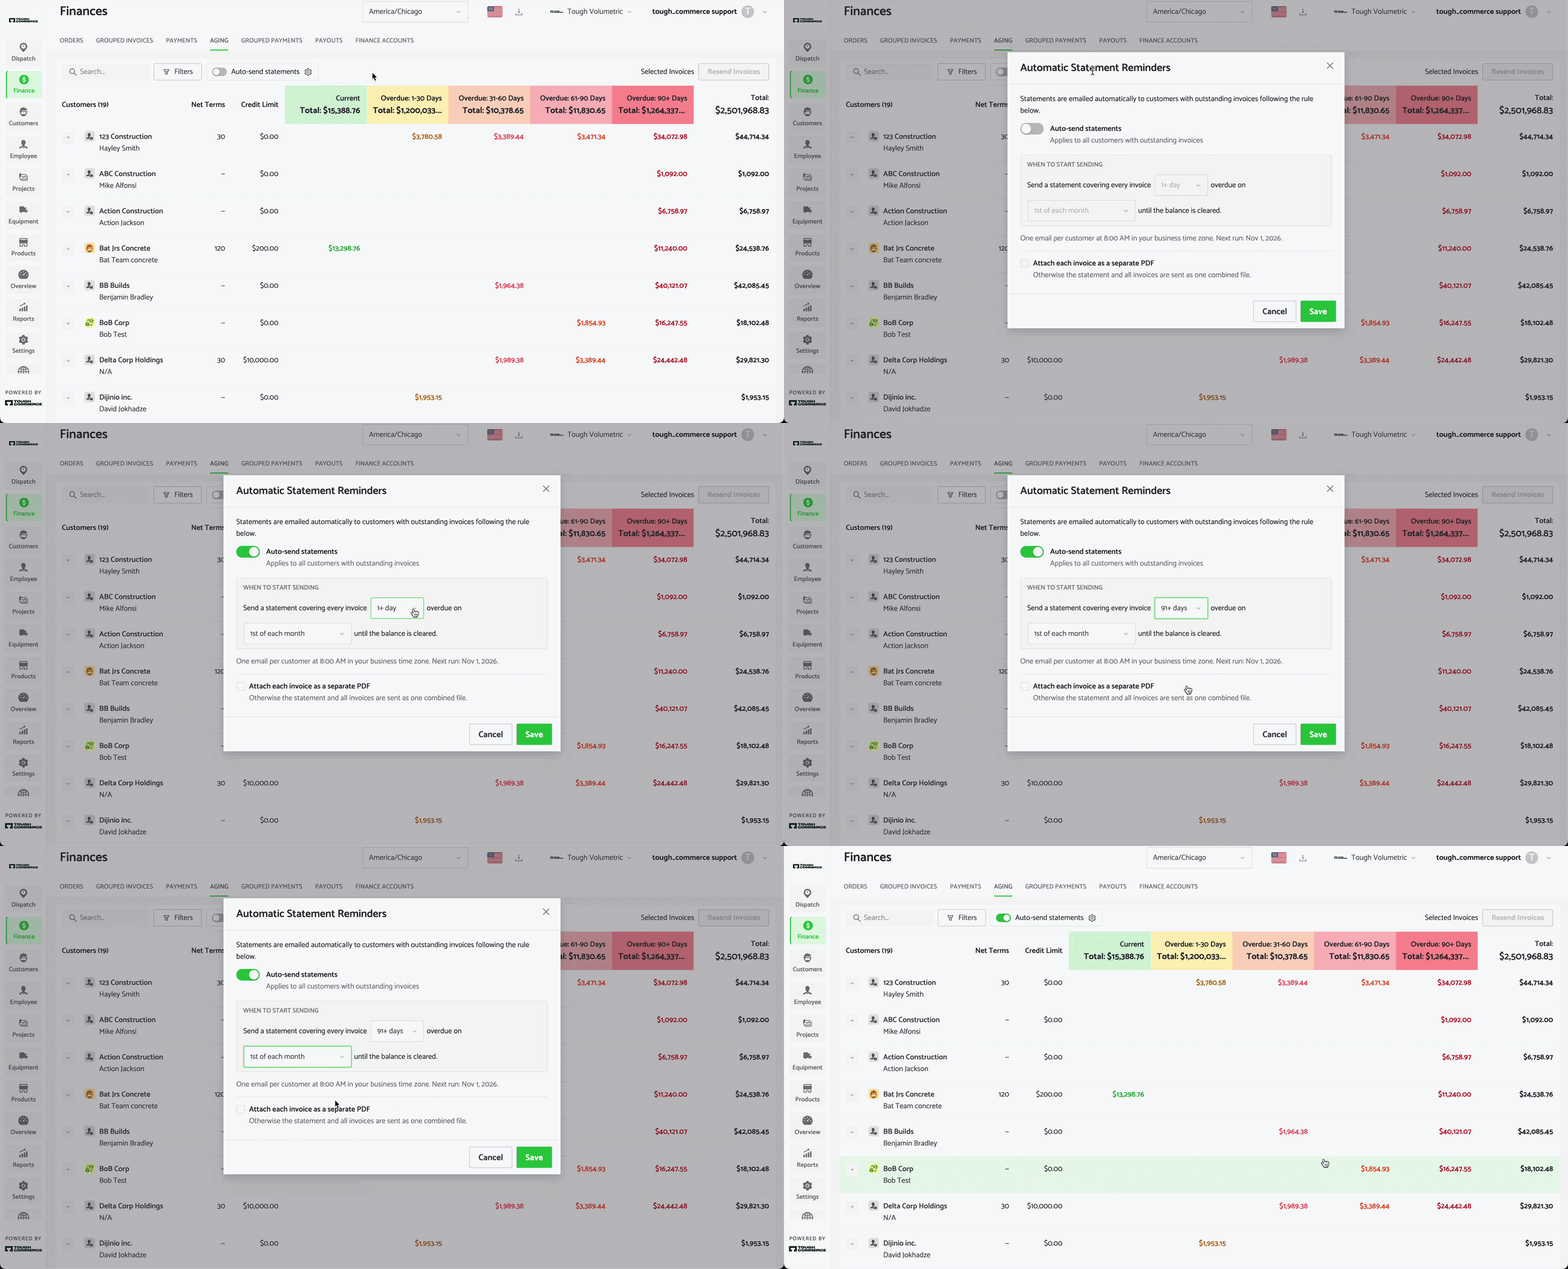
- Click the gear icon beside the Auto-send statements toggle at the top of the page. The Automatic Statement Reminders modal will appear
- Turn on the Auto-send statements toggle. This applies to all customers with outstanding invoices
- Under When to Start Sending, choose:
- How overdue an invoice must be before it's included (for example, 91+ day overdue)
- When the statement is sent (see Send Schedule Options below). The modal confirms when the next statement run will happen (for example, Next run: Nov 1, 2026).
- Choose whether to tick Attach each invoice as a separate PDF
- Click Save
Send Schedule Options
- Monthly: 1st of each month, 15th of each month, last day of the month, or custom days of the month
- Weekly: Every Monday, every Friday, or a custom day
Tip: Sending on the 1st of each month lines statements up with month-end, when most accounts payable teams process their bills. Choose a weekly schedule if you have customers with large balances you want to follow up on more often.
Important details to note about auto-send:
- Customers receive one email per customer, covering every invoice that meets your overdue rule
- Statements are sent at 8:00 AM in your business time zone
- Statements go to each customer's accounting email address(es)
- Statements keep sending on your schedule until the customer's balance is cleared
- Each statement includes the Payment Portal button so customers can pay their balance
- Attach each invoice as a separate PDF is unticked by default, so the statement and invoices are sent as one combined file
To pause automatic statements, switch off the Auto-send statements toggle at the top of the Aging page.
Tracking Sent Statements
Every statement you send, manually or automatically, is recorded in the History of each invoice it included. Click an invoice's 3-dot menu > History to see when the statement was sent, who it went to, and whether it was delivered or viewed.
For more on delivery statuses and resending, see the Resending Invoices & Invoice History article.