![Untitled design (3)-1.png]](https://support.toughcommerce.com/hs-fs/hubfs/Untitled%20design%20(3)-1.png?width=40&height=40&name=Untitled%20design%20(3)-1.png)
The Reports section shows live data from your Dashboard, organized into four report categories: Customers, Financial, Management, and Operations. This article covers how to open a report, filter it, explore the numbers behind it, download it, and send it to anyone by email on a schedule. Use it whenever you need to check performance, share results with your team or a customer, or set up a recurring report.
Please note The Portal Reports tab and the new Reports section will both be available for the next few months. Over time, the new Reports section will replace the Portal reports.
Jump to a section:
- Open a report
- Filter a report
- Read and explore a report
- Download a report
- Email a report on a schedule
- Manage a saved delivery
Definitions
Report: A page of data on one topic, such as customer performance or volume delivered by each piece of equipment. Some reports are tables; others are tiles with totals and charts.
Filter: A setting that limits which data the report shows, such as a date range or a specific customer.
Drill: An option that shows the individual records behind a number in a report. For example, a total can be drilled into to see the data that adds up to it.
Delivery: A copy of a report that Tough Commerce emails to the recipients you choose, either right away or on a schedule.
Alert: A delivery that only sends when the report's results meet a condition you set, such as when the results change.
Open a report
Reports are grouped into four categories. Customers covers how your customers are ordering, Financial covers revenue and payments, Management covers sales summaries by customer, and Operations covers locations, equipment, operators, and volume.
- In the left-hand menu, click Reports (graph icon).
- The Reports page opens and shows a card for each category with the reports inside it.
- Click the name of the report you want to open.
- To see every report in a category, click View All [Category] Reports at the bottom of the card.
- To find a report by name, type in the Search box at the top of the page.
- The report opens. The left-hand list shows every category, so you can switch between reports without going back to the Reports page.
- Click a category name to expand it and see its reports. The number next to each category shows how many reports it contains.
Please note (callout color: orange) While a report loads, you may briefly see the message No Reports. This doesn't mean the report is empty. Wait a few seconds for the data to appear.
Please note (callout color: orange) The categories and reports you see depend on how your account is set up. If you expect to see a report and it's missing, contact your account administrator.
Filter a report
Filters let you limit a report to a time period, customer, location, or other detail. Each report has its own set of filters, so the options you see change from report to report.
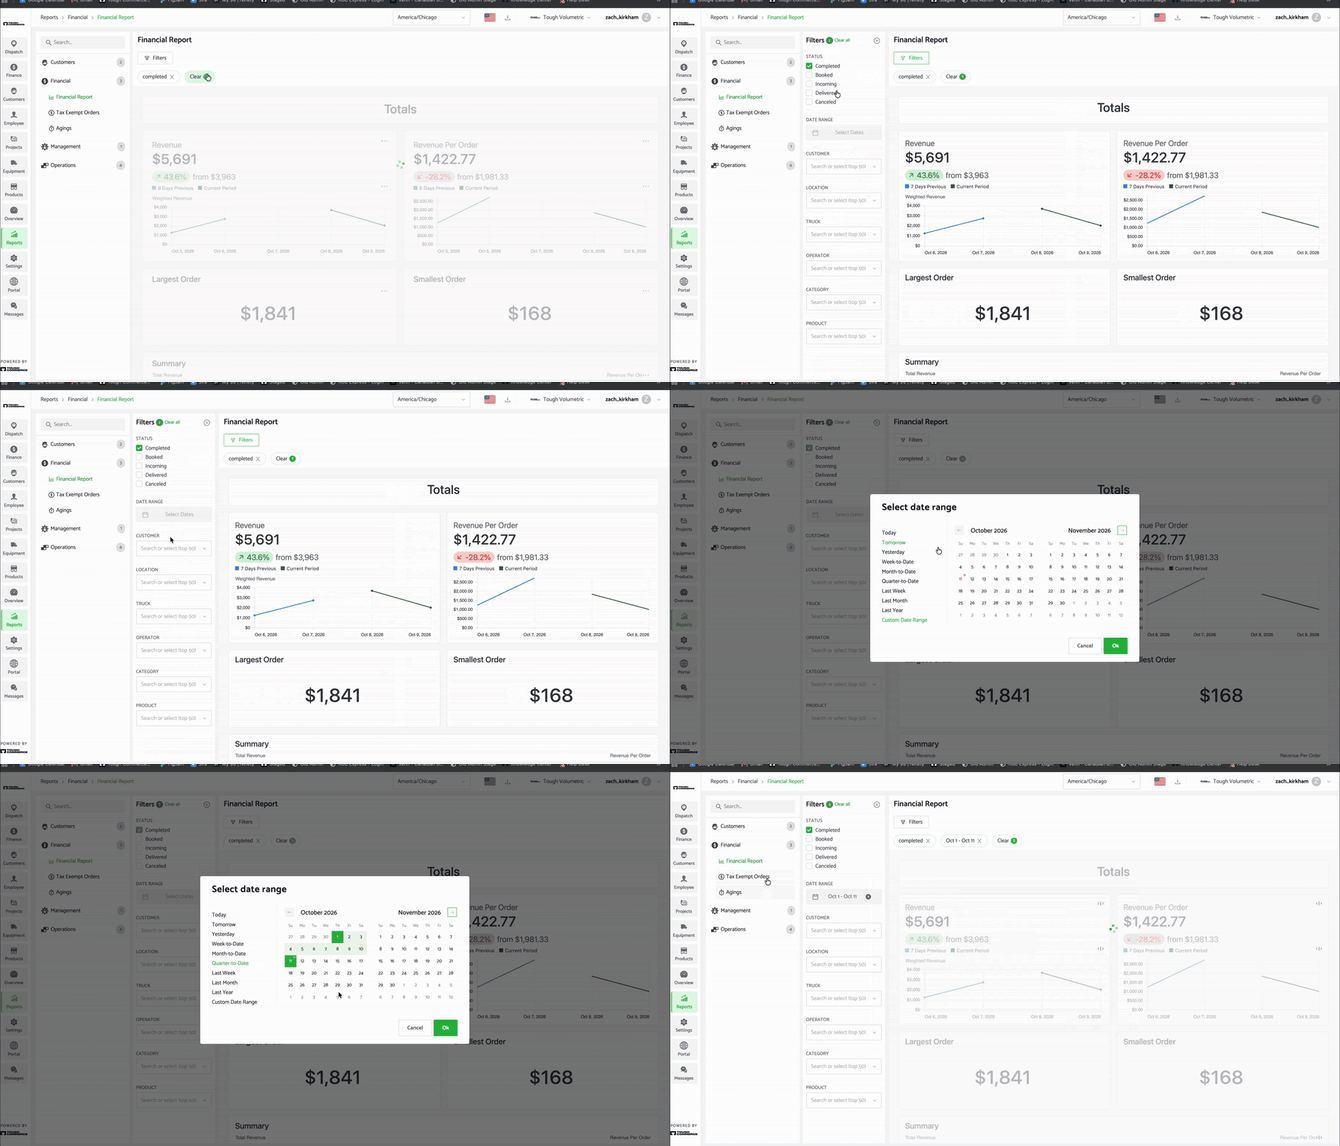
- At the top of the report, click Filters.
- The Filters panel opens on the left. The number next to Filters shows how many filters are currently applied.
- Set the Date Range first. Click the date field to open the Select date range window.
- Choose a preset from the list on the left: Today, Tomorrow, Yesterday, Week-to-Date, Month-to-Date, Quarter-to-Date, Last Week, Last Month, or Last Year.
- To pick your own dates, click a start date and an end date on the calendar. This selects Custom Date Range.
- Click Ok to apply the dates, or Cancel to close without changing them.
- Set any other filters you need. Depending on the report, you may see:
- Status: Check one or more order statuses: Completed, Booked, Incoming, Delivered, or Canceled. The report only includes orders with the statuses you check.
- Customer, Location, Truck, Operator, Category, or Product: Click the field to choose from a list, or type to search. The list shows up to 50 options at a time, so type a name if you don't see the one you need. You can select more than one option; a check mark appears next to each one you select. The Truck filter limits the report to specific equipment.
- The report updates automatically as you change filters.
- Each applied filter appears as a chip under the Filters button.
- To remove one filter, click the X on its chip.
- To remove all filters at once, click Clear under the Filters button, or Clear all at the top of the Filters panel.
- To close the Filters panel, click the X in its top-right corner.
Tip (callout color: blue) Always check the date range before you read a report. Each report opens with its own default date range. Some show today only, while others show the last 7 days, the last 30 days, or the year to date.
Tip (callout color: blue) Not sure what each order status means? See Order Statuses.
Read and explore a report
Reports display data either as a table (rows and columns) or as tiles (large totals, charts, and summaries). Tile reports, such as the Financial Report, compare the current period to the previous period of the same length so you can see whether a number went up or down.
- To sort a table, click any column header. Click it again to reverse the order.
- An arrow next to the header shows which column the table is sorted by and in which direction.
- To see what a column means, hover over the info icon (ⓘ) next to its header.
- To explore a specific number, right-click the cell. A menu opens with three options:
- Drill: Shows the individual records behind that number, so you can see exactly what adds up to the total.
- Copy value: Copies the number so you can paste it somewhere else.
- Expand: [GAP — confirm what Expand does in Tough Commerce reports.]
- When you click Drill, a window opens with the records behind the number. The window title shows which column you drilled into, such as Drill - All Time.
- Filters: Lists what the records are limited to, such as the customer and column you clicked. Click Filters to show or hide the list.
- The number of records appears in the top-right corner, such as "20 rows."
- Run without cache: Reloads the records using the latest data instead of previously saved results.
- Download: Saves the records to your computer.
- Click the X to close the window and return to the report.
- At the bottom of each report, you'll see when the data was generated. Reports use your computer's local timezone.
Download a report
Download a report when you want to save it, attach it to an email yourself, or work with the data in a spreadsheet.
- Apply any filters you want included in the file. The download matches what's on your screen.
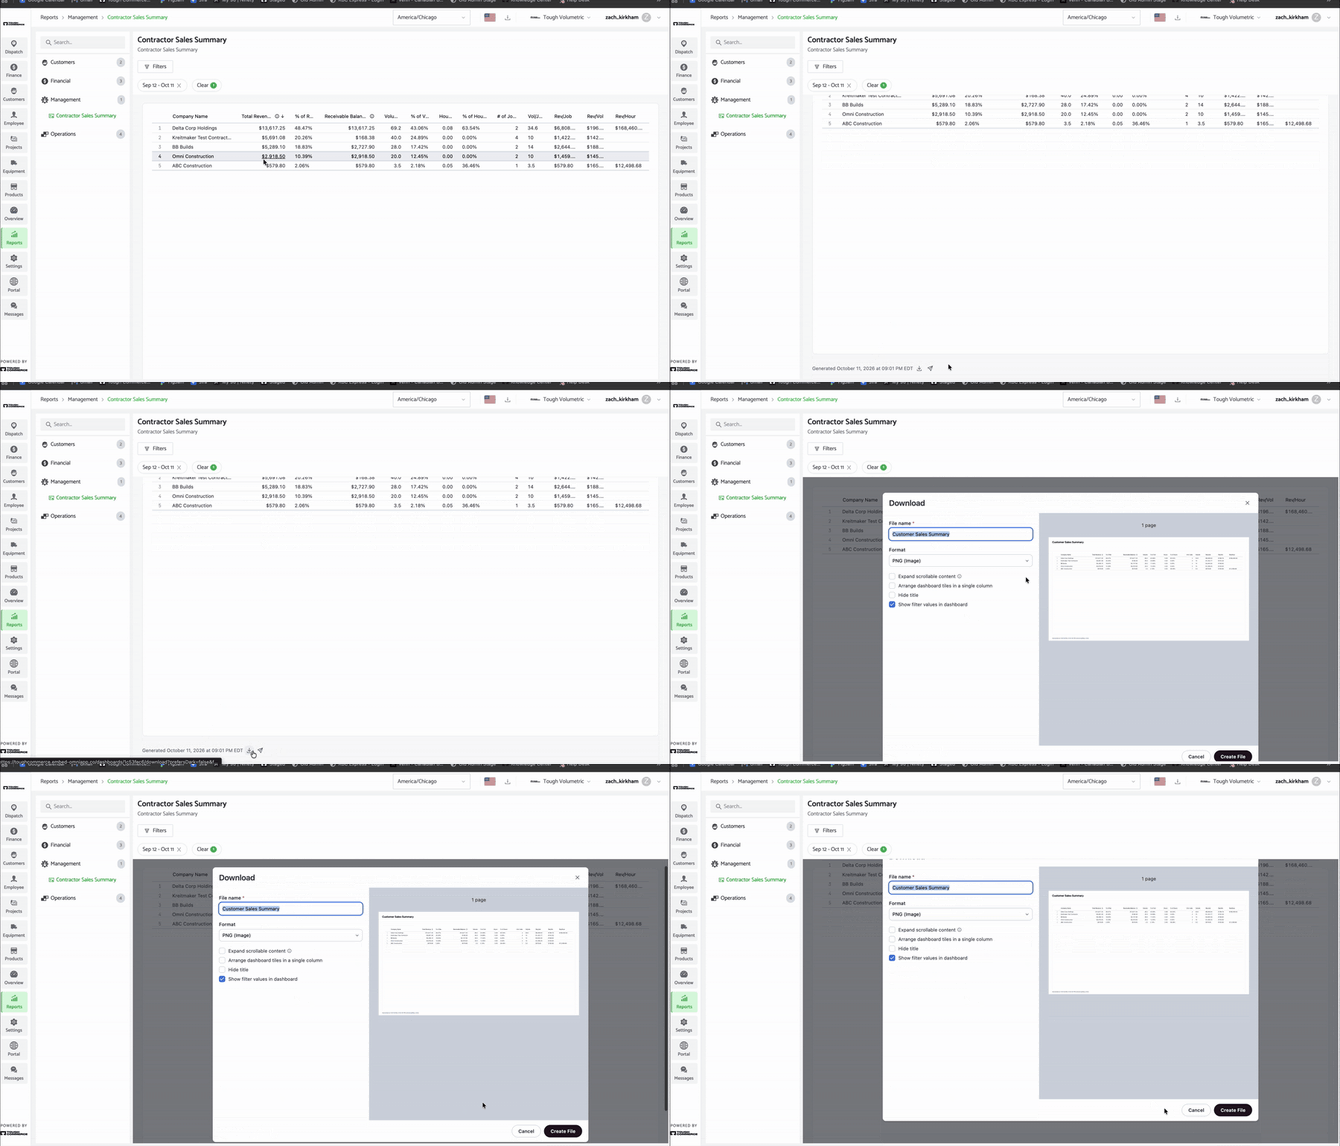
- At the bottom of the report, click the download icon (downward arrow) next to the generated date.
- The Download window opens with a preview of your file on the right.
- In File name, enter a name for the file. This field is required.
- Choose a Format:
- PNG (Image): A picture of the report. Best for sharing a quick snapshot in a message or presentation.
- PDF: A printable document of the report.
- XLSX (Excel): A spreadsheet file. Best if you want to sort, calculate, or edit the data yourself.
- CSVs (in ZIP file): Plain data files bundled into a single ZIP file. Best for importing the data into another system.
- Choose any layout options. The options available can change based on the format you choose.
- Expand scrollable content: Includes rows and columns you'd normally have to scroll to see, instead of only what fits on screen.
- Arrange dashboard tiles in a single column: Stacks the report's tiles one above the other instead of side by side.
- Hide title: Leaves the report name off the file.
- Show filter values in dashboard: Lists the filters you applied in the file, so anyone reading it knows what data it includes. This option is checked by default.
- Click Create File. The file downloads to your computer.
Tip Leave Show filter values in dashboard checked when you share a file with someone else. Without it, they won't know which dates or customers the numbers cover.
Email a report on a schedule
A scheduled delivery emails a copy of a report automatically, either once right now or on a repeating schedule, such as every weekday morning. Recipients can be anyone with an email address, including people who don't have a Tough Commerce login.
Start a new delivery
- Open the report and apply any filters you want the email to include.
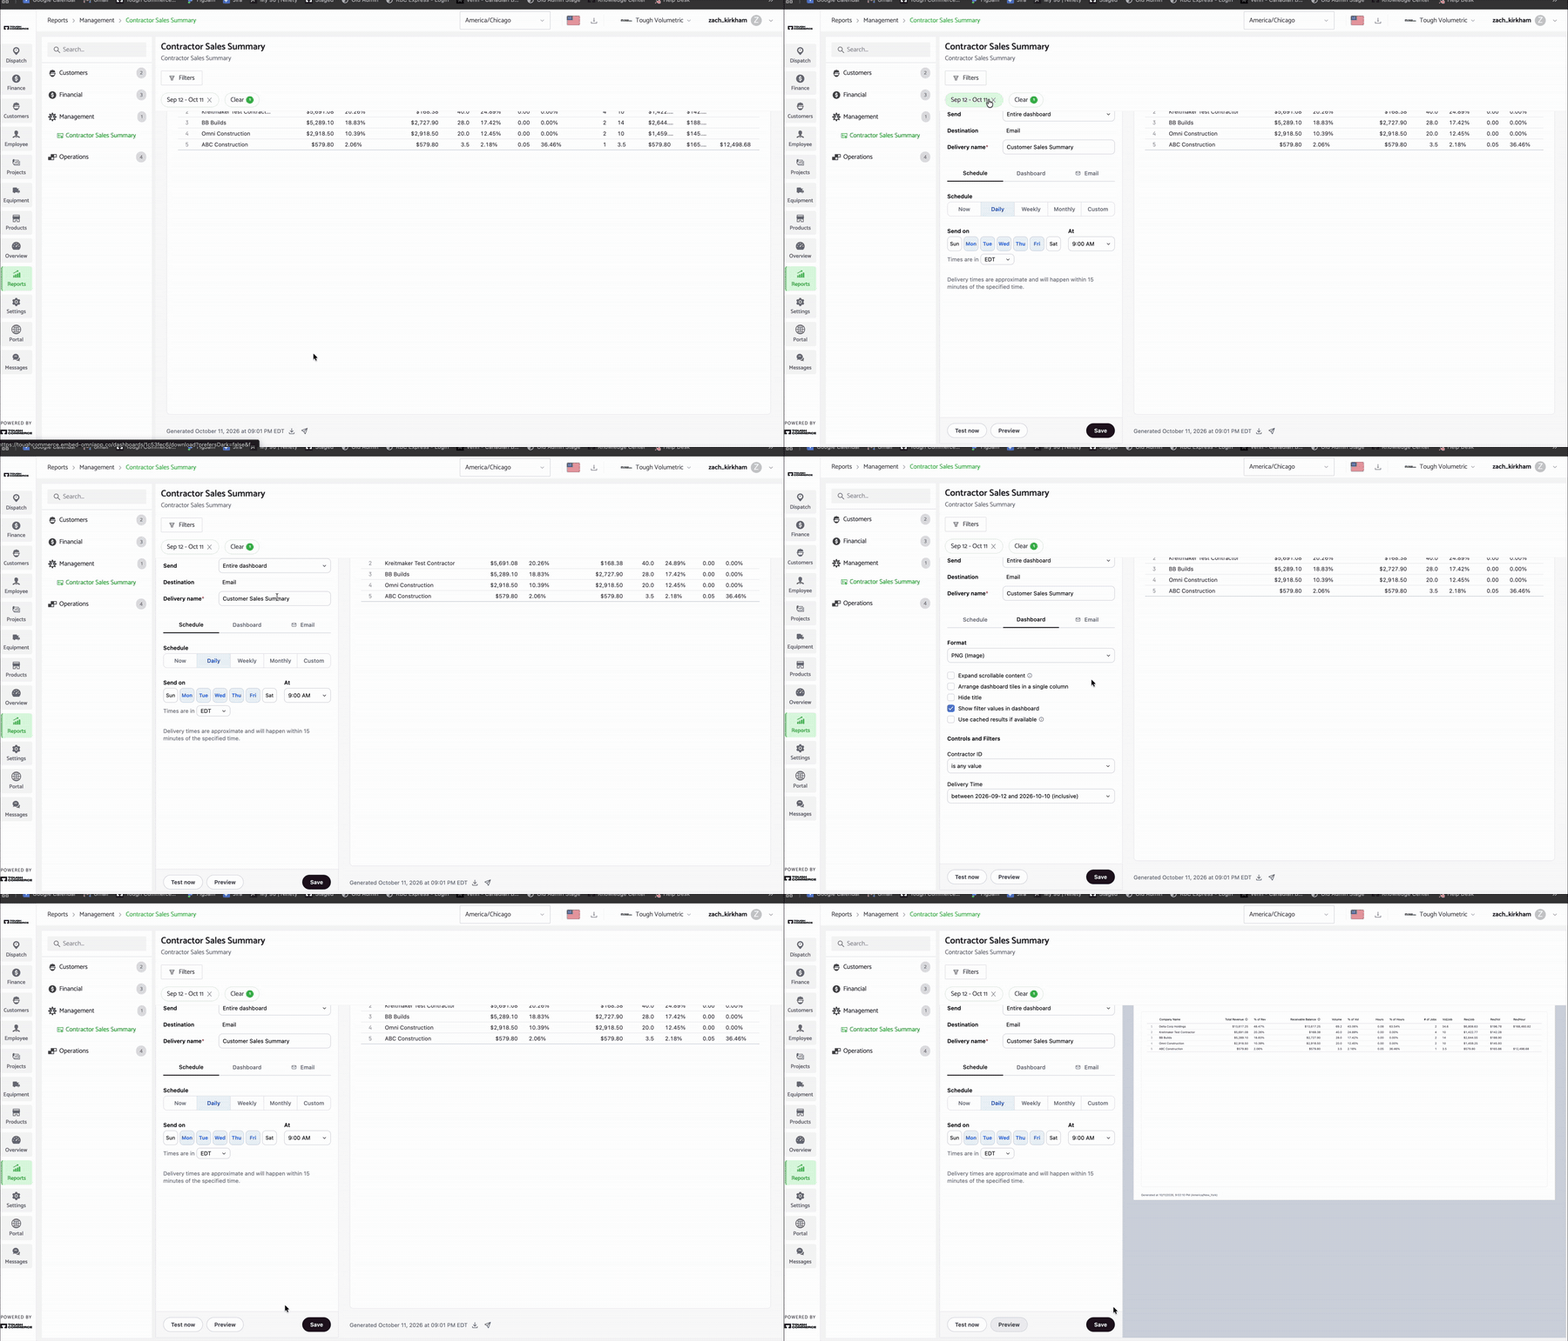
- At the bottom of the report, click the send icon (paper airplane) next to the generated date.
- The Deliveries & Alerts panel opens. It lists every delivery and alert already set up for this report. If there aren't any, you'll see You have no deliveries or alerts for this dashboard.
- Click New. The New delivery form opens, with a preview of the report on the right.
- Next to Delivery, click Schedule.
- In the Send dropdown, choose what to include:
- Entire dashboard: Sends the whole report.
- A specific chart listed under Dashboard charts: Sends only that part of the report.
- Destination shows Email. This is the only option, so there's nothing to change here.
- In Delivery name, enter a name for the delivery, such as "Weekly Customer Report." This field is required and helps you find the delivery later in the Deliveries & Alerts panel.
Choose when it sends (Schedule tab)
The Schedule tab sets how often and when the email goes out.
- Under Schedule, choose a frequency:
- Now
- Daily
- Weekly
- Monthly
- Custom
- In At, choose the time of day to send.
- In Times are in, choose the timezone for the send time.
Please note Delivery times are approximate. Emails go out within 15 minutes of the time you choose.
Choose how the report looks (Dashboard tab)
The Dashboard tab controls the file attached to the email and which data it includes.
- Click the Dashboard tab.
- Choose a Format and layout options. These work the same way as when you download a report, with two additions:
- Paper size: Appears when you choose PDF. Choose Fit page to dashboard (the default) to size the page to the report, or choose a standard size: Legal, Letter, Tabloid, A3, or A4. With PDF, Arrange dashboard tiles in a single column isn't available.
- Use cached results if available: Lets the delivery use previously saved results instead of loading the latest data. Leave this unchecked if recipients need the most up-to-date numbers.
- Under Controls and Filters, review the filter values the delivery will use. A filter set to is any value includes everything.
- To change a filter, click it. Choose a condition, such as is equal to, then enter or select the values to include.
- Turn Match case on if the values must match capital letters exactly.
- To combine more than one condition, click Add condition.
- Click Update to save the filter, or Cancel to leave it unchanged.
Write the email (Email tab)
- Click the Email tab.
- In File Name (without extension), enter a name for the attached file. Leave off the ending, such as ".pdf". It's added for you.
- In Recipients, enter the email address of each person who should receive the report. This field is required.
- In Subject, enter the email's subject line. This field is required and defaults to the delivery name.
- In Body, add an optional message to include in the email.
Check and save
- Click Preview to see what the report will look like in the email.
- Click Save. Your delivery appears in the Deliveries & Alerts panel.
Manage a saved delivery
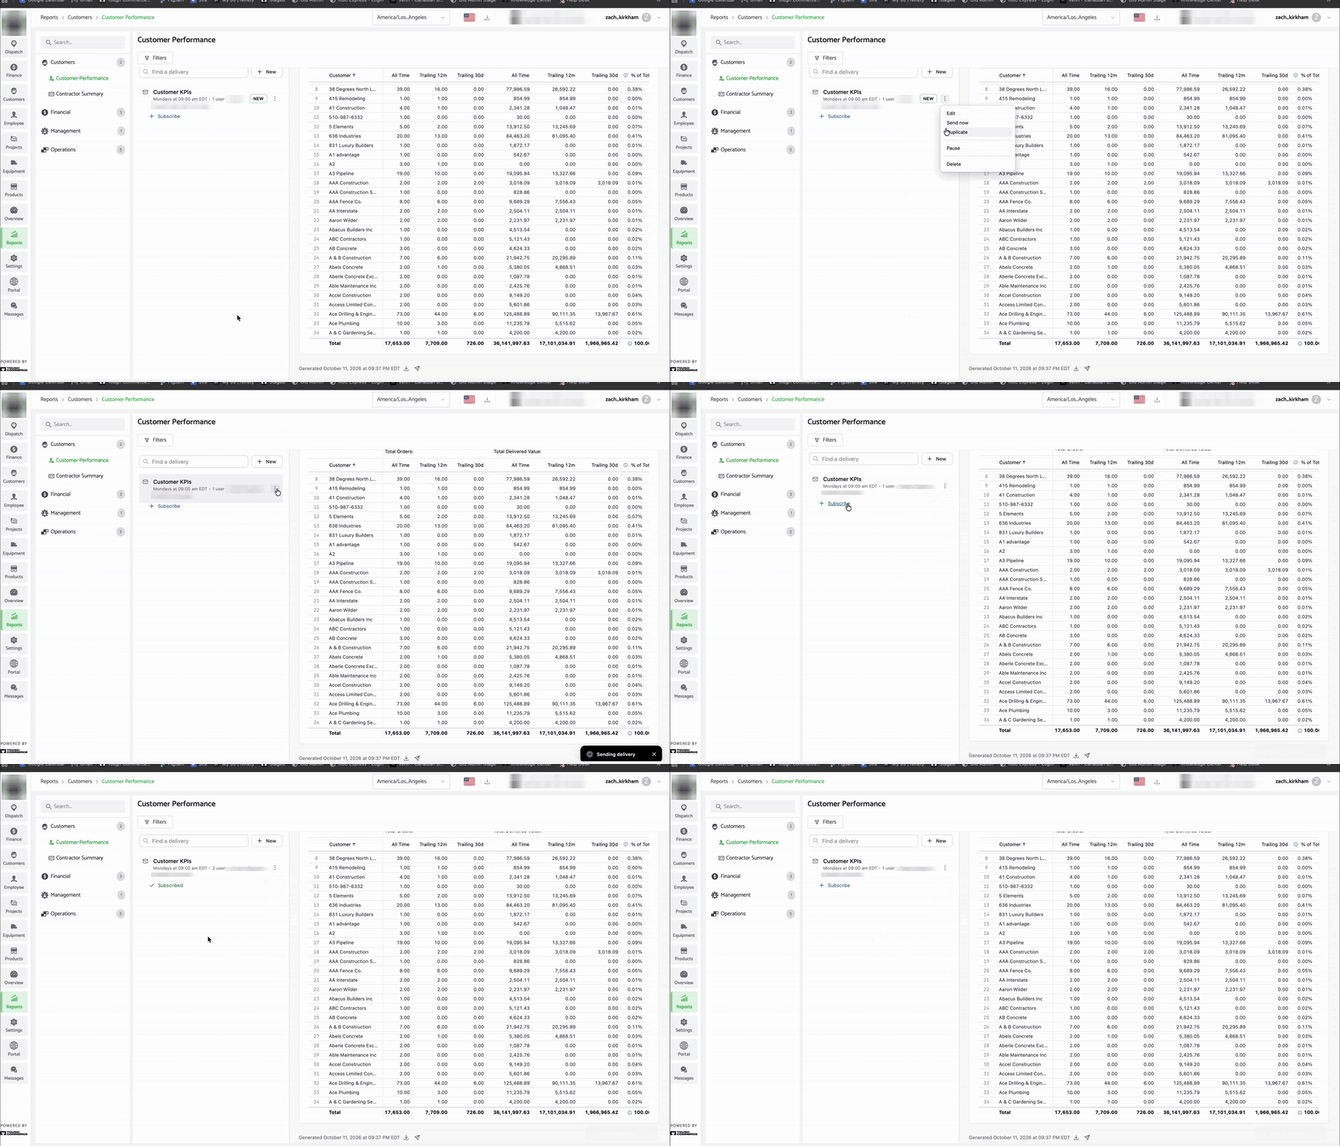
Every saved delivery and alert for a report appears in the Deliveries & Alerts panel. Each one shows its name, when it sends, how many people receive it, and its owner. A NEW label appears on deliveries you've just created.
- At the bottom of the report, click the send icon (paper airplane) to open the Deliveries & Alerts panel.
- If the report has many deliveries, type in Find a delivery to search by name.
- To add yourself as a recipient, click Subscribe under the delivery. It changes to Subscribed, and the number of recipients goes up by one. To stop receiving it, click Subscribed.
- To make other changes, click the three-dot menu (⋮) next to the delivery and choose an option:
- Edit: Opens the delivery so you can change its schedule, layout, or email.
- Send now: Sends the delivery right away, outside its normal schedule. A confirmation window shows how many people will receive it. Click Send now to confirm. A Sending delivery message appears at the bottom of the screen.
- Duplicate: Makes a copy of the delivery. Use this to create a similar delivery with a different schedule or recipients without starting over.
- Pause: Stops the delivery from sending without deleting it.
- Delete: Removes the delivery permanently. Recipients stop receiving it.
Tip Want to check a new delivery before it goes out on schedule? After you save it, use Send now to send a copy right away.
Tip Still using reports in the Portal? See Portal Reports for how those reports work while both versions are available.